
8-2.画面遷移の骨格
戻る
従来のWindowsフォームアプリケーションの画面遷移
通常はボタンをクリックして画面遷移します。
遷画面移元(親)
  // 親画面で子画面を開く時
 private void button1_Click(object sender, EventArgs e)
 {
    Form F = new クラス名();
    F.Owner = this;
    //F.ShowDialog(this); ダイアログで開く時
    F.Show();
    F.Owner.Hide();
  }
遷移先(子画面)
 // 子画面を閉じて親画面を開く時
 private void button2_Click(object sender, EventArgs e)
 {
   //this.Close();   終了する時
   this.Owner.Show();
   this.Close();
 }
上記の例は、Windowsフォームアプリケーションでは、親画面でButtonをWクリックして、button1_Clickメソッドを自動作成させて、その内に画面遷移のコードを書きます。子画面では「閉じる」のButtonをWクリックして、button2_Clickメソッドを自動作成させて、その内に画面遷移のコードを書きます。つまりデザイン画面でButtonをWクリックすればbuttonX_Clickメソッドが自動作成されます。WPFでも同様にClickメソッドを自動作成させて、その内に処理のコードを書くという簡単な方法はあります。(後述のコードビハインドによるコーディング)
しかし、折角、WPFを勉強するならば、次から説明するMVVMを採用すべきです。MVVMは画面とコードをファイルで分離します。そのために、ちょっとコーディング量が多くなりますが慣れれば既に書いたコードをコピーするという方法をとれば面倒さも軽減します。
ここのサンプルのダウンロード(LivetWPFApplicationBasic.lzh)WPFのMVVMでの画面遷移
Buttonクリックによる画面遷移を実装するには、
XAMLでは、
①Buttonをクリックした時のトリガーの記述
②Buttonに画面遷移の処理を記述するCommandの記述
ViewModelでは、
③遷移元画面をタスクバーに残さない記述方法
④画面遷移の処理を記述するICommandと言うメソッドの記述
が必要となります。
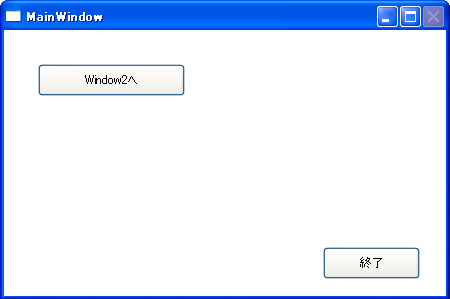
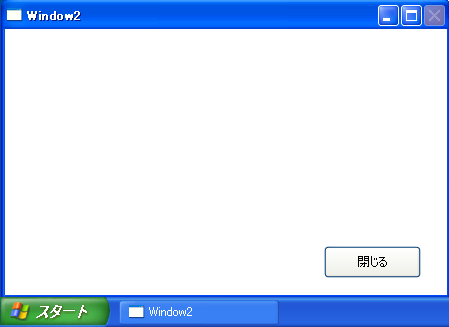
例ainWiえば、Mndowの「Window2へ」ボタンを押してWindow2ヘ画面遷移する例です。
Windows2が表示されても、下のタスクバーには、Window2のみが表示されて、MainWindowは表示されていません。
又、Window2を表示してからMainWindowを隠すので、画面の途切れが発生しないのでちらつきは発生しません。
MainWindowのXAMLは下記のようになります。
12~14行は、ViewとViewModelの紐付けの設定です。。
Interaction.Triggersは、
21~22行は、「Initialize」処理」を実行します。
26~28行は、「Window2への画面遷移」を実行します。
Interaction.Behaviorsは、
33~36行は、「コントロールボックスの閉じるボタンの非使用化」を実行します。
39~41行は、「「Window2への画面遷移」ボタンの実行します。
43~45行は、「「Window2への画面遷移」ボタンの実行します。
View
<Window x:Class="LivetWPFApplication100.Views.MainWindow"
        xmlns="http://schemas.microsoft.com/winfx/2006/xaml/presentation"
        xmlns:x="http://schemas.microsoft.com/winfx/2006/xaml"
        xmlns:i="http://schemas.microsoft.com/expression/2010/interactivity"
        xmlns:l="http://schemas.livet-mvvm.net/2011/wpf"
        xmlns:v="clr-namespace:LivetWPFApplication100.Views"
        xmlns:vm="clr-namespace:LivetWPFApplication100.ViewModels"
        xmlns:b="clr-namespace:LivetWPFApplication100.Behaviors"
        Title="MainWindow" Height="300" Width="450"
        WindowStartupLocation="CenterScreen">

    <Window.DataContext>
        <vm:MainViewModel />
    </Window.DataContext>

    <i:Interaction.Triggers>

        <!--WindowのContentRenderedイベントのタイミングでViewModelの
               Initializeメソッドが呼ばれます-->
        <i:EventTrigger EventName="ContentRendered">
            <l:LivetCallMethodAction MethodTarget="{Binding}" MethodName=
                "Initialize"/>
        </i:EventTrigger>

        <l:InteractionMessageTrigger
            MessageKey="MessageKey2" Messenger="{Binding Messenger}">
            <l:TransitionInteractionMessageAction
                WindowType="{x:Type v:Window2}" Mode="Modal"/>
        </l:InteractionMessageTrigger>

    </i:Interaction.Triggers>

    <i:Interaction.Behaviors>
        <b:CloseButtonBehavior IsWindowCloseEnable=
            "{Binding ElementName=CloseCheck, Path=IsChecked}"/>
    </i:Interaction.Behaviors>

    <Grid>
        <Button Command="{Binding GotoCommand2}"  Content="Window2へ"
                Height="32" HorizontalAlignment="Left" Margin="34,34,0,0"
                Name="button2" VerticalAlignment="Top" Width="147" />

        <Button Command="{Binding CloseCommand}" Content="終了"
                Height="32" HorizontalAlignment="Left" Margin="319,217,0,0"
                Name="button1" VerticalAlignment="Top" Width="97" />
    </Grid>

</Window>
MainWindow.xamlとMainViewModel.csの紐付けは、MainWindow.xamlのコードビハインドファイルであるMainWindow.xaml.csのコンストラクタに「this.DataContext = new MainViewModel();」とも記述出来ます。
コードビハインドによるViewとViewModelの紐付け
public MainWindow()
{
   InitializeComponent();
   this.DataContext = new MainViewModel();
}
ZAMLのButton(39~41行)をクリックした時の処理(命令)はCommandと呼ばれています。このCommandはViewModelの「GotoCommand2」メソッドと紐付け(Binding)されています。
MainWindowのViewModelであるMainViewModelは下記のようになります。
GotoCommand2(ViewModel)
public ViewModelCommand GotoCommand2
{
   get { return new Livet.Commands.ViewModelCommand(Goto2); }
}
public void Goto2()
{
   Messenger.Raise(new TransitionMessage(new ViewModel2() { NeedHideOwner = true },
   "MessageKey2"));
}
ZAMLのButton(43~45行)をクリックした時の処理(命令)は「CloseCommand」メソッドと紐付け(Binding)されています。
CloseCommand(ViewModel)
private ViewModelCommand _CloseCommand;
public ViewModelCommand CloseCommand
{
   get
   {
       if (_CloseCommand == null)
       {
          _CloseCommand = new ViewModelCommand(Close);
       }
       return _CloseCommand;
   }
}
public void Close()
{
   var window = Application.Current.Windows.OfType<Window>().SingleOrDefault((w) =>
   w.IsActive);
}
遷移先のWindow2のXAMLは下記のようになります。太字部分(LoadedやClosing)はMVVMパターンでは有名な Expression Blend SDK に含まれる System.Windows.Interactivity.dll のクラス (EventTrigger, InvokeAction, Interaction 等)を使用してWPFのコントロールのイベントとViewModel等で公開される ICommand を実装したコマンドプロパティをコードビハインドファイルやハンドラを使用せずにxaml上で関連付ける方法 でSystem.Windows.Interactivity名前空間の EventTrigger クラスの EventName に コマンドと関連付けるイベントを設定し、 InvokeCommandAction によりコマンドとの関連づけを行っています。 ListBoxでは、EventTriggerのEventNameとしては「MouseEnter」、「MouseLeave」、「SelectionChanged」などがあります。
[WPF] コントロールの任意のイベントとコマンド xaml上で関連付けるView
	<Window x:Class="LivetWPFApplication100.Views.Window2"
        xmlns="http://schemas.microsoft.com/winfx/2006/xaml/presentation"
        xmlns:x="http://schemas.microsoft.com/winfx/2006/xaml"
        xmlns:i="http://schemas.microsoft.com/expression/2010/interactivity"
        xmlns:l="http://schemas.livet-mvvm.net/2011/wpf"
        xmlns:v="clr-namespace:LivetWPFApplication100.Views"
        xmlns:vm="clr-namespace:LivetWPFApplication100.ViewModels"
        xmlns:b="clr-namespace:LivetWPFApplication100.Behaviors"
        Title="Window2" Height="300" Width="450"
        WindowStartupLocation="CenterScreen">

    <i:Interaction.Triggers>
        <!--WindowのContentRenderedイベントのタイミングでViewModelの
        Initializeメソッドが呼ばれます-->
        <i:EventTrigger EventName="ContentRendered">
            <l:LivetCallMethodAction MethodTarget="{Binding}" MethodName=
            		"Initialize"/>
        </i:EventTrigger>

        <i:EventTrigger EventName="Loaded">
            <i:InvokeCommandAction Command="{Binding Path=Loaded}"
                CommandParameter="{Binding Mode=OneTime,RelativeSource=
                		{RelativeSource
                Mode=FindAncestor,AncestorType={x:Type Window}}}"/>
        </i:EventTrigger>

        <i:EventTrigger EventName="Closing">
            <i:InvokeCommandAction Command="{Binding Path=Closing}"
                CommandParameter="{Binding Mode=OneTime,RelativeSource=
                {RelativeSource Mode=FindAncestor,AncestorType={x:Type Window}}}"/>
        </i:EventTrigger>

        <l:InteractionMessageTrigger MessageKey="Close" Messenger=
        		"{Binding Messenger}">
            <l:WindowInteractionMessageAction/>
        </l:InteractionMessageTrigger>
    </i:Interaction.Triggers>

    <i:Interaction.Behaviors>
       <b:CloseButtonBehavior IsWindowCloseEnable="{Binding ElementName=CloseCheck,
                Path=IsChecked}"/>
    </i:Interaction.Behaviors>

    <Grid>
        <Button Command="{Binding CloseCommand}" Content="閉じる" Height="32"
                HorizontalAlignment="Left" Margin="319,217,0,0" Name="button1"
                VerticalAlignment="Top" Width="97" />
    </Grid>

</Window>
Window2のViewModelであるViewModel2.csは下記のようになります。
ViewModel
using System;

// ObservableCollection
using System.Collections.Generic;
using System.Linq;

//INotifyPropertyChanged
//PropertyChanged
using System.ComponentModel;

//参照設定が必要
//using System.Configuration;

using Livet;
using Livet.Commands;
using Livet.Messaging;
//CloseCommand
using Livet.Messaging.Windows;

//ICommand
//using System.Windows.Input;

using System.Windows;


namespace LivetWPFApplication100.ViewModels
{
    class ViewModel2 : ViewModel
    {
        public ViewModel2()
        {
            var Loaded = new Livet.Commands.ListenerCommand<Window>((w) =>
            {
                if (NeedHideOwner && w.Owner != null && w.Owner.Visibility ==
                				Visibility.Visible)
                {
                    w.Owner.Hide();
                }
            });

            var Closing = new Livet.Commands.ListenerCommand<Window>((w) =>
            {
                if (NeedHideOwner && w.Owner != null)
                {
                    w.Owner.Show();
                }
            });
        }

        public bool NeedHideOwner { get; set; }
        //public ICommand Loaded { get; private set; }
        //public ICommand Closing { get; private set; }

        public void Initialize()
        {
            XCloseButtonManager.Disable();
        }

        #region CloseCommand
        private ViewModelCommand _CloseCommand;
        public ViewModelCommand CloseCommand
        {
            get
            {
                if (_CloseCommand == null)
                {
                    _CloseCommand = new ViewModelCommand(Close);
                }
                return _CloseCommand;
            }
        }
        public void Close()
        {
            var window = Application.Current.Windows.OfType<Window>().
            					SingleOrDefault((w) => w.IsActive);
            window.Close();
        }
        #endregion
    }
}