
9.ログイン画面
この画面のポイント
下記の3つです。
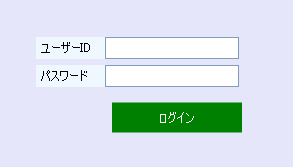
①パスワードボックスの表示をアスタリスク(*)にする方法と
②Buttonのクリック時の入力されたユーザーID・パスワードと社員マスターとの照合処理の方法と
③ユーザーコントロール(UserControl)の設定方法です。
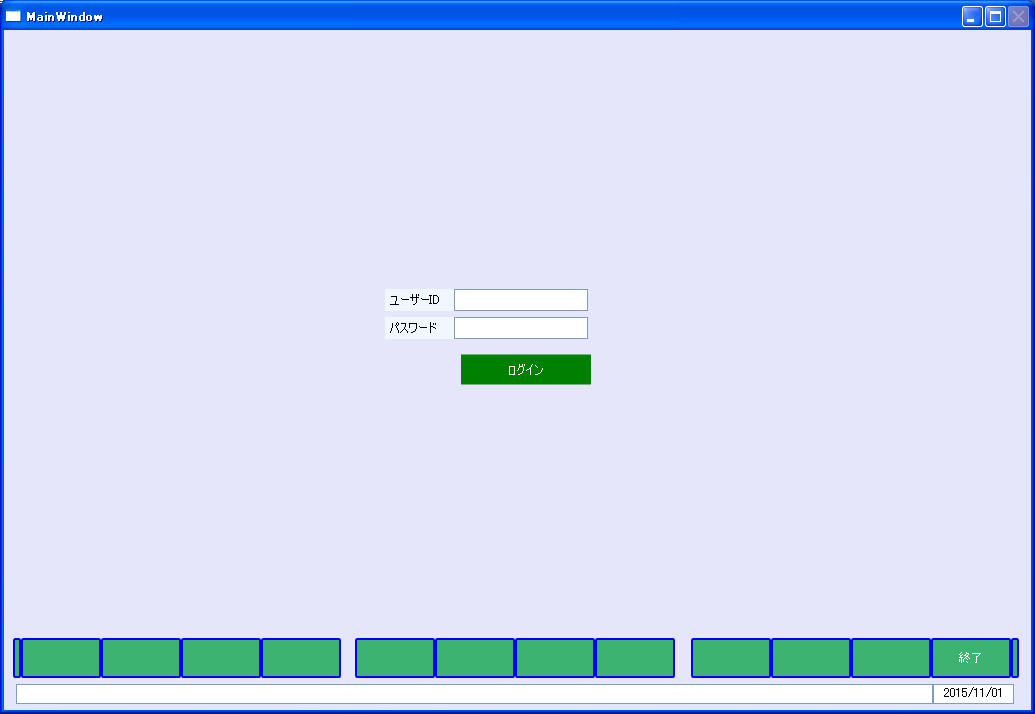
画面
上の画面は下記のXAMLで書かれています。
i:Interaction.Triggersの25行目のContentRenderedイベントがInitializeメソッドを呼び出し、30行目のl:TransitionInteractionMessageActionで
Window2ヘの画面遷移を行います。
実際の遷移は、65行目のButtonのクリックで発生するCommandであるGotoCommand22で行います。
40行目のGridタグのBackground="#FFE6E6FA"でGridの背景色を指定しています。
52行目がTextBoxにtxtユーザーIDをバインディング(紐付け)しています。
55~61行でpasswordBoxにtxtパスワードをバインディングしています。
Behaviorとは、既存のコントロールに機能を追加するもので、58行目では、入力文字をアスタリスク(*)に変換しています。
View
<Window x:Class="LivetWPFApplication100.Views.MainWindow"
        xmlns="http://schemas.microsoft.com/winfx/2006/xaml/presentation"
        xmlns:x="http://schemas.microsoft.com/winfx/2006/xaml"
        xmlns:i="http://schemas.microsoft.com/expression/2010/interactivity"
        xmlns:l="http://schemas.livet-mvvm.net/2011/wpf"
        xmlns:v="clr-namespace:LivetWPFApplication100.Views"
        xmlns:vm="clr-namespace:LivetWPFApplication100.ViewModels"
        xmlns:b="clr-namespace:LivetWPFApplication100.Behaviors"
        Title="MainWindow" Height="714" Width="1035"
        WindowStartupLocation="CenterScreen">

    <Window.Resources>
        <ResourceDictionary>
            <ResourceDictionary.MergedDictionaries>
                <ResourceDictionary Source="/Resources/Styles.xaml"/>
                <ResourceDictionary Source="/Resources/Styles2.xaml"/>
                <ResourceDictionary Source="/Resources/StylesBG.xaml"/>
            </ResourceDictionary.MergedDictionaries>
        </ResourceDictionary>
    </Window.Resources>

    <i:Interaction.Triggers>
        <!--WindowのContentRenderedイベントのタイミングで
        ViewModelのInitializeメソッドが呼ばれます-->
        <i:EventTrigger EventName="ContentRendered">
         <l:LivetCallMethodAction MethodTarget="{Binding}" MethodName="Initialize"/>
        </i:EventTrigger>
        <l:InteractionMessageTrigger
            MessageKey="MessageKey2" Messenger="{Binding Messenger}">
            <l:TransitionInteractionMessageAction
                WindowType="{x:Type v:Window2}" Mode="Modal"/>
        </l:InteractionMessageTrigger>
    </i:Interaction.Triggers>

    <i:Interaction.Behaviors>
        <b:CloseButtonBehavior IsWindowCloseEnable="{Binding ElementName=CloseCheck,
        Path=IsChecked}"/>
    </i:Interaction.Behaviors>

    <Grid  Background="#FFE6E6FA">
        <Label Background="AliceBlue" Content="ユーザーID" Height="22"
         HorizontalAlignment="Left" Margin="381,259,0,0" Name="label1"
         VerticalAlignment="Top" Width="70" />
        <Label Background="AliceBlue" Content="パスワード" Height="22"
        HorizontalAlignment="Left" Margin="381,287,0,0" Name="label2"
        VerticalAlignment="Top" Width="70" />

        <TextBox InputMethod.PreferredImeState="Off"
        Style="{StaticResource HighlightTextBox}" Height="22"
        HorizontalAlignment="Left"
        Margin="450,259,429,0" Name="txtユーザーID"
        Text="{Binding Path=txtユーザーID}"
        VerticalAlignment="Top" Width="134" />

        <PasswordBox MaxLength="10"   Height="22" HorizontalAlignment="Left"
        Margin="450,287,0,0" VerticalAlignment="Top" Width="134">
            <i:Interaction.Behaviors>
                <b:PasswordBindBehavior Password="{Binding txtパスワード,
                   Mode=TwoWay}" />
            </i:Interaction.Behaviors>
        </PasswordBox>

        <Button Style="{StaticResource CommandTemplate}" Content="ログイン"
        Width="130" Height="30"
                Command="{Binding GotoCommand22}"
                HorizontalAlignment="Center" VerticalAlignment="Center"
                Margin="450,322,433,323"
                Foreground="White" />

        <v:UserControlFooterN1  Margin="0,0,0,0" HorizontalAlignment="Left"
                VerticalAlignment="Bottom"  />
    </Grid>
</Window>
ビヘイビア
using System;
using System.Collections.Generic;
using System.Linq;
using System.Text;

using System.Windows.Controls;
using System.Windows.Interactivity;
using System.Windows;

namespace LivetWPFApplication100.Behaviors
{
    public class PasswordBindBehavior : Behavior<PasswordBox>
    {
        static bool initialized = false;
        public string Password
        {
            get
            {
                return (string)GetValue(PasswordProperty);
            }
            set
            {
                SetValue(PasswordProperty, value);
            }
        }
        public static readonly DependencyProperty PasswordProperty =
        					DependencyProperty.Register(
            "Password"
            , typeof(string)
            , typeof(PasswordBindBehavior)
            , new UIPropertyMetadata(null));
        private void Init()
        {
            if (this.AssociatedObject is PasswordBox)
            {
               this.AssociatedObject.Password = (string)GetValue(PasswordProperty);
            }
        }
        protected override void OnAttached()
        {
            base.OnAttached();
            if (!initialized)
            {
                this.Init(); initialized = true;
            }
            this.AssociatedObject.PasswordChanged += PasswordChanged;
        }

        void PasswordChanged(object sender, RoutedEventArgs e)
        {
            SetValue(PasswordProperty, ((PasswordBox)sender).Password);
        }
        protected override void OnDetaching()
        {
            base.OnDetaching();
            this.AssociatedObject.PasswordChanged -= PasswordChanged;
        }
    }
}
処理
MainWindowの処理はViewModelフォルダにMainViewModelという名称で作成しました。(名称は何でもよろしいです)
ソースはリンクをクリックしますとフルコードで表示されます。
ここのサンプルのダウンロード(MainViewModel.lzh)MainWindowのViewModelであるMainViewModelの変更通知プロパティは下記のようになります。
ViewModel
 #region 変更通知プロパティ
   public string txtユーザーID { get; set; }
   public string txtパスワード { get; set; }
#endregion
MainWindowのViewModelであるMainViewModelは下記のようになります。
ViewModel
  public ViewModelCommand GotoCommand22
 {
   get { return new Livet.Commands.ViewModelCommand(Goto22); }
 }
 public void Goto22()
 {
   if (txtユーザーID == null)
   {
     MessageBox.Show("ユーザーIDが未入力です");
     return;
   }
   if (txtパスワード == null)
   {
      MessageBox.Show("パスワードが未入力です");
      return;
   }
   if (!作業員マスターログインチェック(txtユーザーID.ToUpper(), txtパスワード))
   {
      MessageBox.Show("ユーザーIDが違うかパスワードが違います");
      return;
   }

      Messenger.Raise(new TransitionMessage(new ViewModel2()
      { NeedHideOwner = true }, "MessageKey2"));
   }
社員マスターログインチェックメソッドは、引数で渡した社員コードが社員マスターに存在すれば、
trueを返します。
ここでのConnectionStringの書き方は、Oracleノ場合です。SQLサーバー等々の他のデータベースの
時は、別途、調べて下さい。
ここでは、OracleConnectionをusing ステートメントで指定しています。これによって、リソースを取得し、ステートメントを実行してから、リソースを自動的に破棄します。
社員マスターログインチェック
#region 社員マスターログインチェック
  public bool 社員マスターログインチェック(string str社員コード,
  string strパスワード)
  {
    bool bRet = false;

    using (OracleConnection con = new OracleConnection())
    {

       con.ConnectionString = "User Id=UserId; Password=Password;
       			Data Source=DnsName;Pooling=false;";
                con.Open();
                //
                string strSQL = String.Format("SELECT COUNT(*) AS CNT FROM
                社員マスター Where 社員コード = '{0}' AND パスワード = '{1}'",
                str社員コード.ToUpper(), strパスワード);

                OracleCommand oracmd = new OracleCommand(strSQL, con);
                OracleDataReader reader = oracmd.ExecuteReader();

                while (reader.Read() == true)
                {
                    if (Convert.ToInt16(reader["CNT"].ToString()) > 0)
                    {
                        bRet = true;
                    }
                }
                return bRet;
            }
        }
        #endregion
UserId、Password、DnsNameは実際のものに置き換えてください。
遷移先のWindow2のXAMLは下記のようになります。太字部分(LoadedやClosing)はMVVMパターンでは有名な Expression Blend SDK に含まれる System.Windows.Interactivity.dll のクラス (EventTrigger, InvokeAction, Interaction 等)を使用してWPFのコントロールのイベントとViewModel等で公開される ICommand を実装したコマンドプロパティをコードビハインドファイルやハンドラを使用せずにxaml上で関連付ける方法 でSystem.Windows.Interactivity名前空間の EventTrigger クラスの EventName に コマンドと関連付けるイベントを設定し、 InvokeCommandAction によりコマンドとの関連づけを行っています。 ListBoxでは、EventTriggerのEventNameとしては「MouseEnter」、「MouseLeave」、「SelectionChanged」などがあります。
[WPF] コントロールの任意のイベントとコマンド xaml上で関連付けるView
<Window x:Class="LivetWPFApplication100.Views.Window2"
        xmlns="http://schemas.microsoft.com/winfx/2006/xaml/presentation"
        xmlns:x="http://schemas.microsoft.com/winfx/2006/xaml"
        xmlns:i="http://schemas.microsoft.com/expression/2010/interactivity"
        xmlns:l="http://schemas.livet-mvvm.net/2011/wpf"
        xmlns:v="clr-namespace:LivetWPFApplication100.Views"
        xmlns:b="clr-namespace:LivetWPFApplication100.Behaviors"

        Title="Window2" Height="714" Width="1035"
        WindowStartupLocation="CenterScreen">

    <Window.Resources>
        <ResourceDictionary>
            <ResourceDictionary.MergedDictionaries>
                <ResourceDictionary Source="/Resources/Styles.xaml"/>
                <ResourceDictionary Source="/Resources/Styles2.xaml"/>
                <ResourceDictionary Source="/Resources/StylesBG.xaml"/>
            </ResourceDictionary.MergedDictionaries>
        </ResourceDictionary>
    </Window.Resources>

    <i:Interaction.Triggers>
        <!--WindowのContentRenderedイベントのタイミングでViewModelのInitialize
        メソッドが呼ばれます-->
        <i:EventTrigger EventName="ContentRendered">
            <l:LivetCallMethodAction MethodTarget="{Binding}"
          MethodName="Initialize"/>
        </i:EventTrigger>
        <l:InteractionMessageTrigger
            MessageKey="MessageKey3" Messenger="{Binding Messenger}">
            <l:TransitionInteractionMessageAction
                WindowType="{x:Type v:Window3}" Mode="Modal"/>
        </l:InteractionMessageTrigger>

        <i:EventTrigger EventName="Loaded">
            <i:InvokeCommandAction Command="{Binding Path=Loaded}"
              CommandParameter="{Binding Mode=OneTime,
         RelativeSource={RelativeSource Mode=FindAncestor,
          AncestorType={x:Type Window}}}"/>
        </i:EventTrigger>

        <i:EventTrigger EventName="Closing ">
            <i:InvokeCommandAction Command="{Binding Path=Closing}"
            CommandParameter="{Binding Mode=OneTime,
            RelativeSource={RelativeSource Mode=FindAncestor,
            AncestorType={x:Type Window}}}"/>
        </i:EventTrigger>

        <l:InteractionMessageTrigger MessageKey="Close"
          Messenger="{Binding Messenger}">
            <l:WindowInteractionMessageAction/>
        </l:InteractionMessageTrigger>
    </i:Interaction.Triggers>

    <i:Interaction.Behaviors>
      <b:CloseButtonBehavior IsWindowCloseEnable="{Binding ElementName=CloseCheck,
      Path=IsChecked}"/>
    </i:Interaction.Behaviors>

    <Grid  Background="#FFE6E6FA">
        <Button Command="{Binding Path=GotoCommand63-2}" Content="Goto63-2"
        FontSize="16" Foreground="White"  Width="470" Height="35"
        Margin="40,0,503,266" Style="{StaticResource CommandTemplate}"
        VerticalAlignment="Bottom" />
        <v:UserControlFooterN2 Margin="0,0,0,0" HorizontalAlignment="Left"
        VerticalAlignment="Bottom" />
    </Grid>
</Window>
Window2のViewModelであるViewModel2.csは下記のようになります。
ViewModel2.cs
using System;

// ObservableCollection
using System.Collections.Generic;
using System.Linq;


//INotifyPropertyChanged
//PropertyChanged
using System.ComponentModel;

//参照設定が必要
//using System.Configuration;

using Livet;
using Livet.Commands;
using Livet.Messaging;
//CloseCommand
using Livet.Messaging.Windows;

//ICommand
using System.Windows.Input;
using System.Windows;
using Common;

namespace LivetWPFApplication100.ViewModels
{
    class ViewModel2 : ViewModel
    {
    	Window win = null;
        public ViewModel2()
        {
            Loaded = new Livet.Commands.ListenerCommand<Window>((w) =>
            {
                if (NeedHideOwner && w.Owner != null &&
                w.Owner.Visibility == Visibility.Visible)
                {
                    win = w;
                    //w.Owner.Hide();
                }
            });

            Closing  = new Livet.Commands.ListenerCommand<Window>((w) =>
            {
                if (NeedHideOwner && w.Owner != null)
                {
                    w.Owner.Show();
                }
            });
        }
        public bool NeedHideOwner { get; set; }
        public ICommand Loaded { get; private set; }
        public ICommand Closing { get; private set; }

        public void Initialize()
        {
        	if (win != null) win.Owner.Hide();
            XCloseButtonManager.Disable();
        }
ここで使われているデータベースは下記の通りです。
社員マスターCONNECT beluran/beluran@beluran;
DROP TABLE 社員マスター CASCADE CONSTRAINTS;
CREATE TABLE 社員マスター
(
社員コード VARCHAR2(10) NOT NULL ENABLE,
社員名 VARCHAR2(20) NOT NULL ENABLE,
社員姓名 VARCHAR2(14) NOT NULL ENABLE,
カナ名 VARCHAR2(25) NOT NULL ENABLE,
部署コード VARCHAR2(7),
会社コード VARCHAR2(7),
ログインコード VARCHAR2(20),
メールアドレス VARCHAR2(50),
パスワード VARCHAR2(50),
SEQ NUMBER(9,0) NOT NULL,
統括区分 CHAR(1) DEFAULT '0' NOT NULL ENABLE,
SYS_DEL_FLG CHAR(1) DEFAULT '0' NOT NULL ENABLE,
PRIMARY KEY(社員コード)
);
CONNECT beluran/beluran@beluran;は、最初のbeluranはユーザーIDで、次のbeluranはパスワードで、最後のbeluranはデータベース名です。